
Solving BowTiedPickle's Vault Exercise
Solving BowTiedPickle's Vault Exercise
The process of designing and implementing a programming exercise

Recently, BowTiedPickle published an exercise for aspiring Solidity developers to practice their development. I gave it a shot and got some really good feedback. In this post I’d like to go over my approach to these type of problems and how I solved the vault contract.
Setup
Before we get started we need to set up our environment. You can do all this on the online Remix IDE but I prefer to work in my own IDE. My setup is WebStorm + Ganache + Truffle. I write the .sol files in my WebStorm IDE using a syntax plugin. From there I can compile the files to my local Ganache blockchain using Truffle. This also allows me to run unittests on my contracts to assure that everything works as it should.
When it comes to development I prefer a clean and test driven approach. It’s always tempting to hold off with unittests until later, but by placing them at the front you always end up with cleaner and more reliable code.
Let’s start things off by setting up our contract and asserting that we can succesfully run our unittests.
// SPDX-License-Identifier: GPL-3.0

pragma solidity 0.8.13;

contract Vault {

    address public _owner;

    constructor() {
        _owner = msg.sender;
    }
}
Our vault.sol file
const Vault = artifacts.require("Vault");

contract("Vault", accounts => {
    const owner = accounts[0];

    it("Should be owned by the deployer of the contract", async () => {
        const vaultInstance = await Vault.new({from: owner});

        assert.equal(await vaultInstance._owner(), owner);
    });
});
Our vault-test.js file
If your environment is set up correctly this should pass and show that we can deploy the contract and set the owner to the address that deployed it.
Design
Now for the fun part, designing our solution. Proper development always starts with a proper design. If you simply start writing lines of code you end up with messy code and unexpected behaviour.
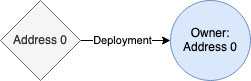
If we sketch out the flow of our current contract it only has two states: undeployed and deployed. When it is deployed the account that deploys it becomes the owner of that contract. Simple stuff. But what will we need for our final Vault contract?
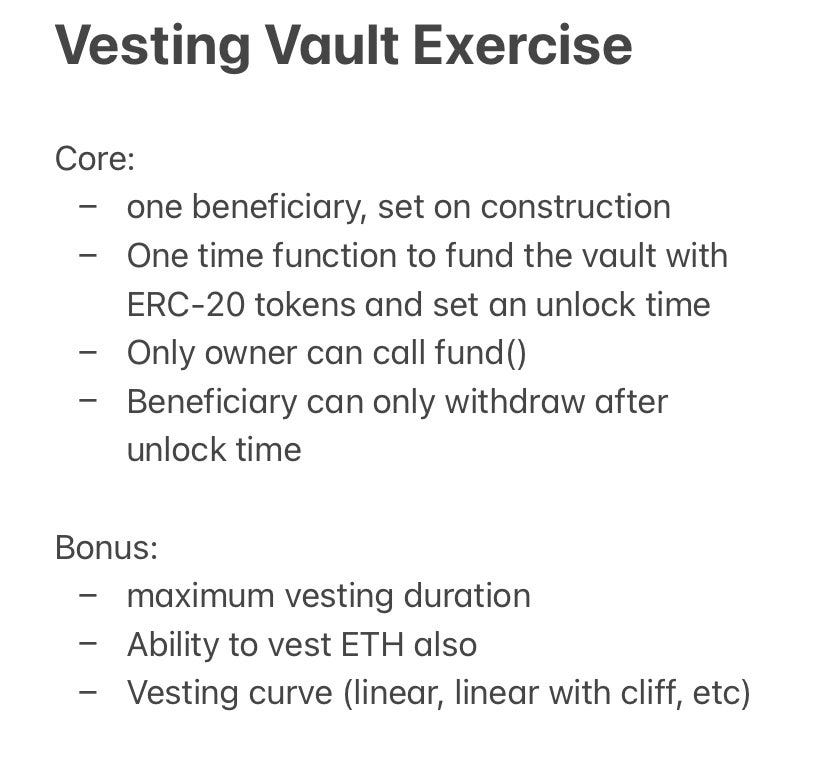
The requirements set by BowTiedPickle were:
One beneficiary, set on construction
One time function to fund the vault with ERC-20 tokens and set an unlock time
Only the owner can call this method
Only beneficiary can withdraw and only after the unlock time has passed
Looking at these specifications there are three states for our contract: construction, funding, and withdrawing.

Going through these specifications gives me the following flow. When the contract is constructed and turns blue it has two attributes: it’s owner and beneficiary. At this point there is only one method that can be called and only by the owner. Calling this method sends ERC-20 tokens to the contract and specifies the lock time. After this the contract turns red and only the withdraw method can be called and only by the recipient. If the recipient does this before the lock time has ended it will stay red, if the recipient does this after the lock time has ended the contract will send the tokens to the recipient and become useless.
By sketching out the flow of our code like this we become very conscious of how we want to structure our code. This allows us to come up with good design patterns and think about our implementations in a more abstract level. Every junior I work with struggles on this front. Most dive into the code straight away and get stuck half way through with no clear idea of what they’re stuck on and where they’re going. The majority of programming is simply abstract problem solving.
Define
From here it’s simply a matter of implementing our solution step by step. If I sketch out the flow diagram in our unit tests I get something like this:
const Vault = artifacts.require("Vault");

contract("Vault", accounts => {
    const owner = accounts[0];
    const recipient = accounts[1];
    const locktime = 5;

    // Construct
    it("Should be owned by the deployer of the contract", async () => {
        const vaultInstance = await Vault.new(recipient, {from: owner});

        assert.equal(await vaultInstance._owner(), owner);
    });

    it("Should be deployed with a set recipient", async () => {
        const vaultInstance = await Vault.new(recipient, {from: owner});

        assert.equal(await vaultInstance._recipient(), recipient);
    });


    // Fund
    it("Should have a fund method that can only be called once by the owner", async () => {
    });

    it("Should be fundable with ERC-20 tokens that are sent to the Vault contract", async () => {
    });

    it("Should have a locktime argument that specifies when the tokens can be withdrawn", async () => {
    });

    // Withdraw
    it("Should have a withdraw method that can only be called by the recipient", async () => {
    });

    it("Should be able to send the tokens to the recipient after the locktime has ended", async () => {
    });

    it("Should do nothing if the recipient tries to withdraw funds before the locktime", async () => {
    });

});
A more in depth rundown of our vault-test.js file.
Our Vault contract should be finished when we can prove that it passes all of these tests. All I’ve done here is breakdown our flow diagram into atomic testable elements and we allready have a clear checklist to build our contract. By approaching our development process in this way we keep things structured and organised. If we do this well the rest of our contract should now be extremely simple.
Do
From here we simply have to implement our unittests one by one and we’re done. Most of these are very simple to do. For example, making sure only the owner can call the fund() method is as simple as setting require(msg.sender == _owner). The great thing about this approach to programming is that it puts the most important part of the work upfront, the design and architecture. This allows us to always be conscious of what we’re making and why. By keeping a structured approach to our programming like this we can make sure our code is clean and reproducable.
When writing your code try to keep in mind that someone else will have to read it in the future. Clean and understandable code helps you to understand what you’re doing. Try to stick to industry standards for formatting. With Python this would mean conforming to PEP 8. Solidity has their style guide too. Learning to write clean and well formatted code is a skill you can only learn by repetition. When you’re finished with your code try to go back and reformat it according to these style guides, eventually you won’t need them anymore.
From here it’s merely a matter of iteration. BowTiedPickle has some great guides on how some protocols are formatted. Drawing out existing architectures like this is a great way to practice designing well thought out code. Try to think about why they made certain design choices and how they impact the flow of the code. For testing and coding it’s merely a matter of practice. Getting feedback from others helps a lot too, if you can get code reviews anywhere you should take it.
If you want to see the final solution I came up with you can find it here. There’s still a lot to improve but I’m looking forward to grow as a Solidity developer. I hope you learnt from this and this method helps you to become a better programmer. Feel free to reach out to me here or on twitter @BowtiedProngHrn for any questions. I’m also happy to give any code reviews for Python if you’re trying to learn.