
Expanding Our First Website
Expanding Our First Website
Adding more pages and decorating with CSS

Now that we have the basic setup for our website in place it’s time to build it out. What we will be doing here is:
Adding the rest of the pages to set up all the content
Using CSS to style our website properly
At the end of this substack we will have a website that will look similar to the one on bowtiedisland.com. So you know exactly what to do to create a static website by yourself.
Adding more pages to your website
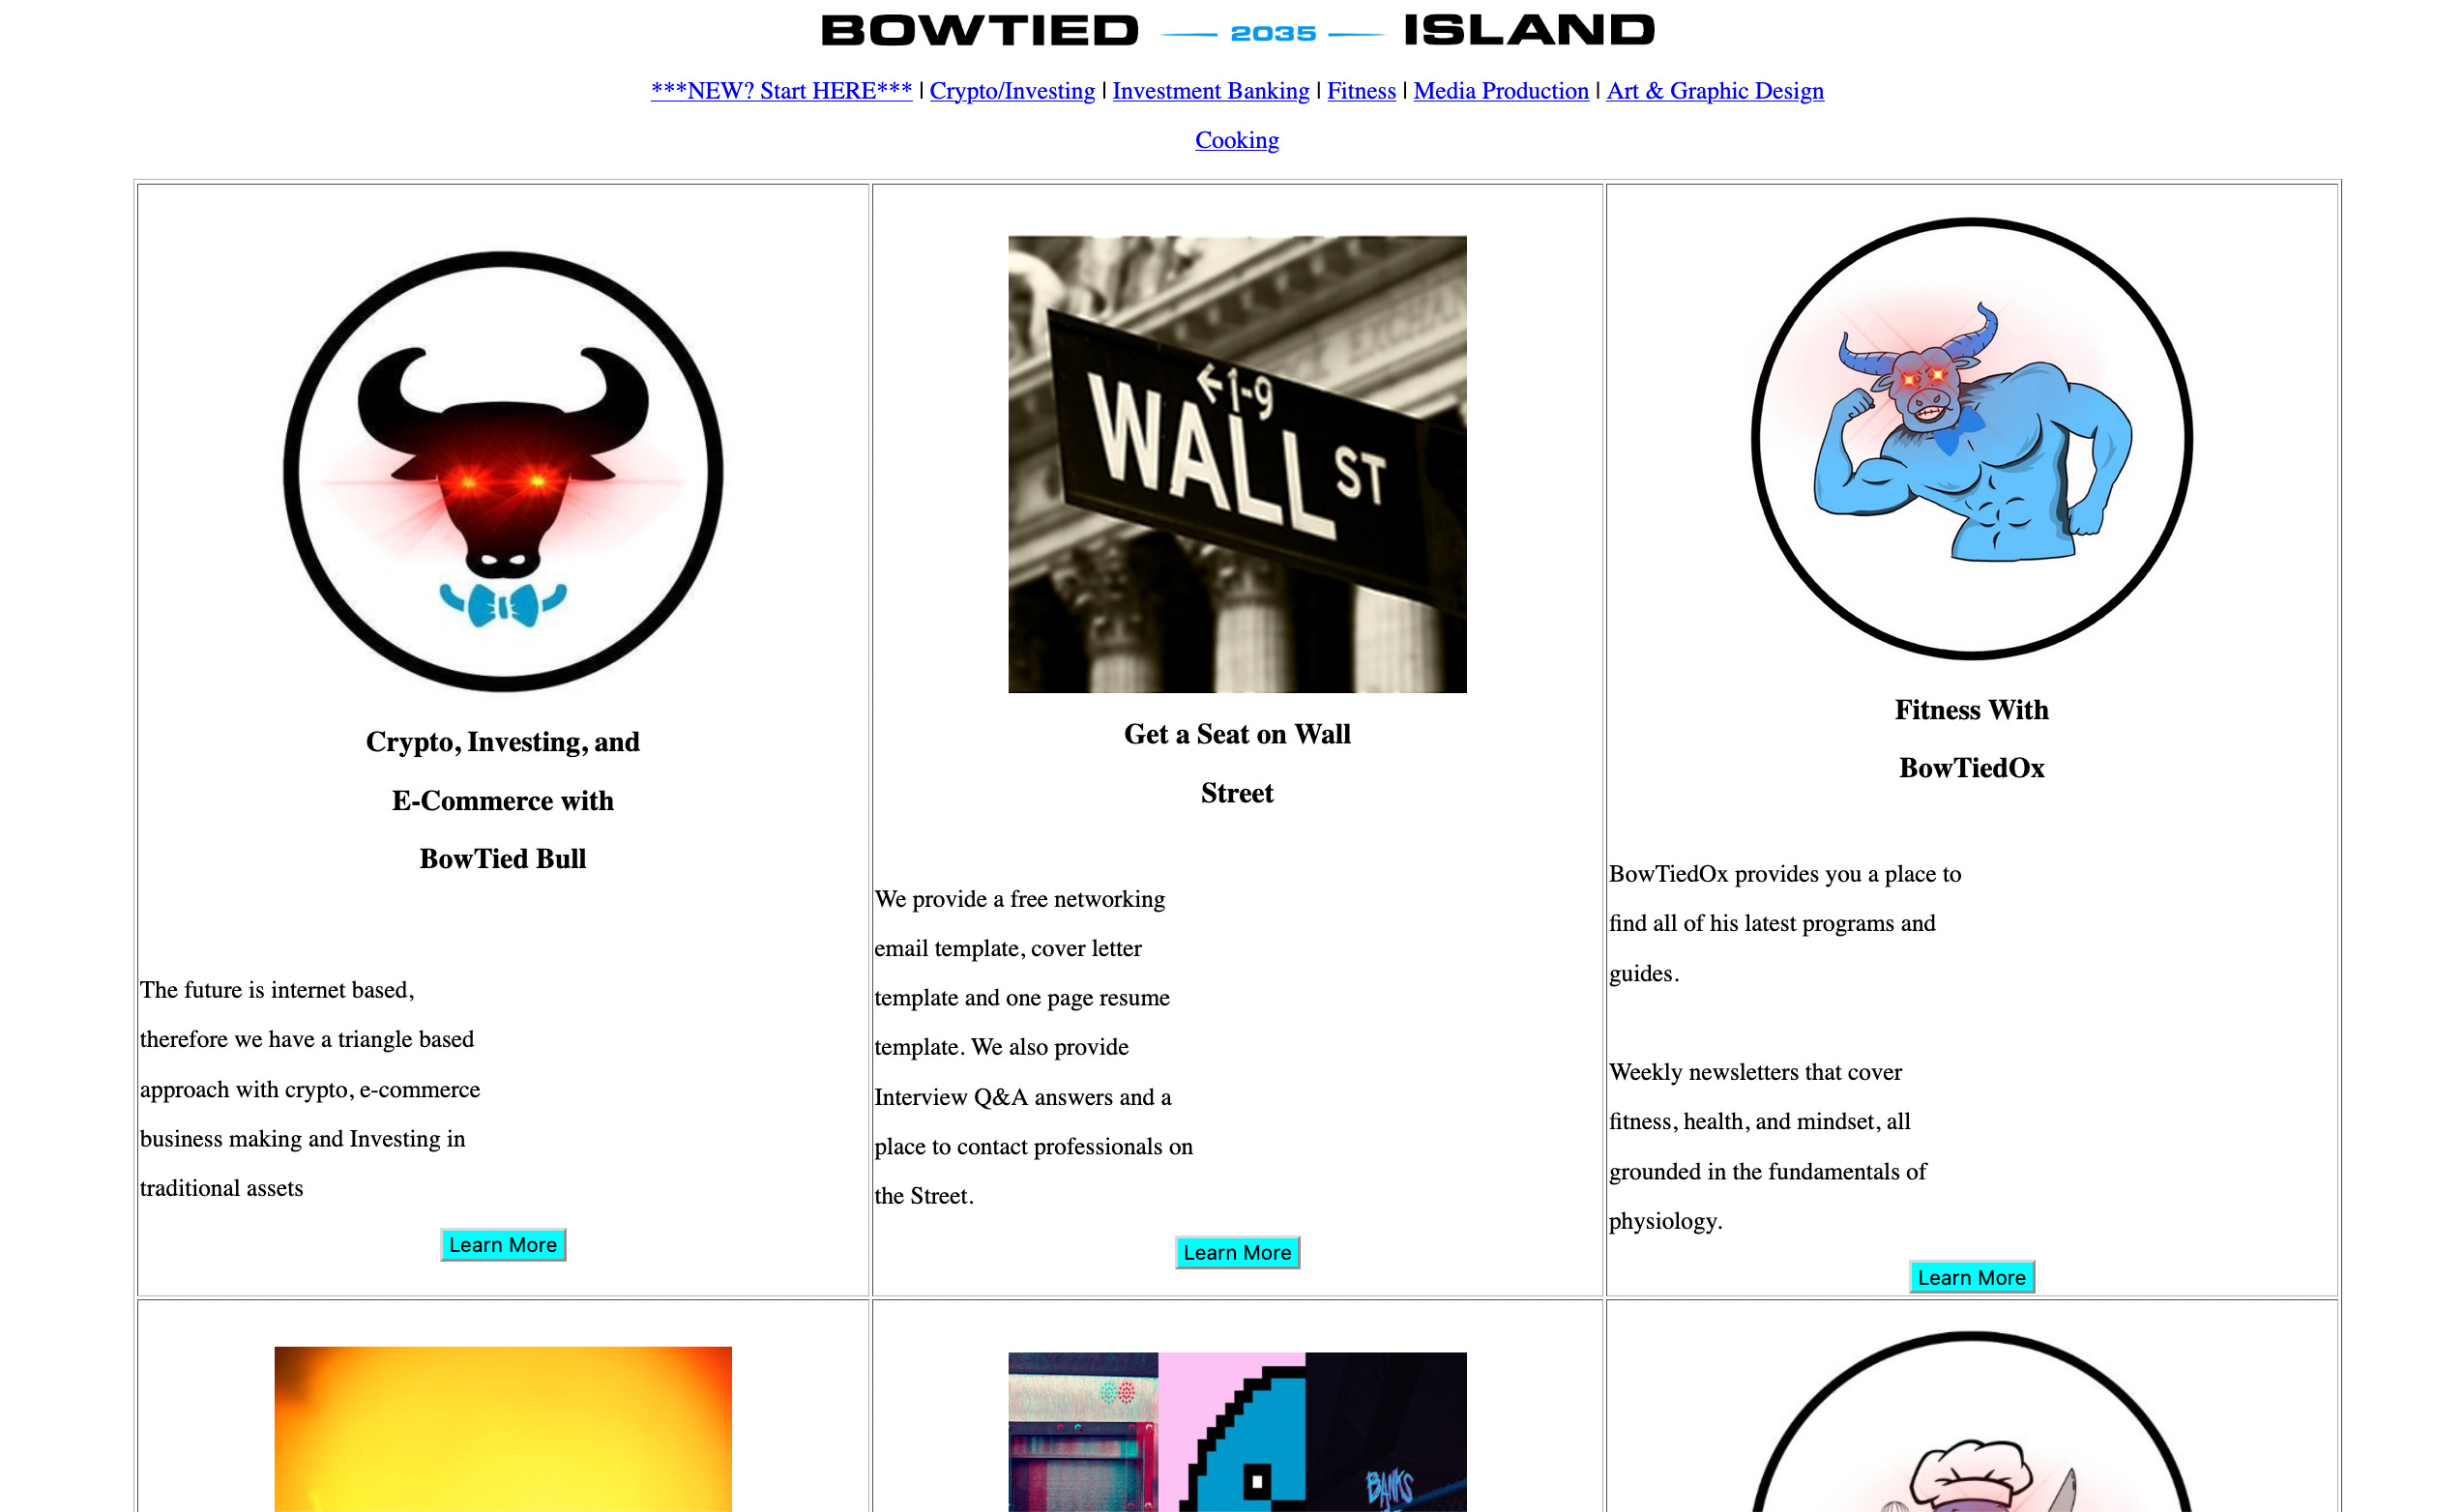
Last post we ended things with our homepage. We had made a template for the design that would show across the entire website. We were tasked with finding a simple way to emulate the homepage of bowtiedisland.com.
The solution I came up with was to use an html table. If you look at the bowtiedisland homepage you can see that it’s a 3x2 table. Each cell contains an image, some text, and a button.
We already know how to add images and text, so let’s look at the table.
<! — /MySite/templates/home.html >
{% extends 'base.html' %}
{% block title %}Home{% endblock %}
{% block content %}
<table>
<tr>
<td>Cell1</td>
<td>Cell2</td>
</tr>
<tr>
<td>Cell3</td>
<td>Cell4</td>
</tr>
</table>
{% endblock %}
This is the basic code to make a table in html.
With <tr></tr> you can make a new table row. With <td></td> you can add cells to this table. Using this we can recreate the homepage as a basic html table. Add the images and text to each cell like this:
<td>
<div style="text-align:center;">
<p><img src=“Image_Url” width="300"></p>
<h3>Crypto, Investing, and </h3>
<h3>E-Commerce with </h3>
<h3>BowTied Bull</h3>
</div>
<p>The future is internet based, </p>
<p>therefore we have a triangle based </p>
<p>approach with crypto, e-commerce</p>
<p>business making and Investing in </p>
<p>traditional assets</p>
<p style="text-align:center;"><button type="button" style="background-color:cyan;">Learn More</button></p>
</td>
And you can recreate the first cell in the homepage. It doesn’t look good yet, it’s missing a lot of the stylistic elements of the original website. But we’ll worry about that later.
Another new thing you might have noticed is the button at the bottom of the cell. This can be done with <button>Button Text</button>. For now it doesn’t do anything, later on we will add a link to other pages when we’ve made them.
Do this for all cells and you should have recreated the basic idea of the home page:
Put a basic outline in your html file:
<! — /MySite/templates/start-here.html —>
{% extends 'base.html' %}
{% block title %}Home{% endblock %}
{% block content %}
<p>Start Here</p>
{% endblock %}
Add the domain to your urls:
<! — /MySite/MySite/urls.py —>
from django.contrib import admin
from django.urls import path
from BowtiedIsland import views
urlpatterns = [
path('admin/', admin.site.urls),
path('', views.loadhomepage, name='home'),
path('start-here/', views.load_start_here, name='start-here'),
]
Note we added a line to our urlpatterns. The way to do this is:
path(‘url’, function_to_call_page, name)
The url will be where your browser will go to load the page. Because we called it ‘start-here/‘ it means the url will be: www.website.com/start-here to load your start-here.html file. The function is what we define in views.py to give the actual page to your computer.
<! — /MySite/BowtiedIsland/views.py —>

…

def load_start_here(request):
    return render(request, ‘start-here.html')

…
Now if you add ‘/start-here’ to the end of your url it should point you to the html file you just created.
Now we can build out the rest of the pages. But we also want to link to them of course. For example, if someone clicks on the header image they should be brought back to their home page, and if they click on ***NEW? Start Here*** in the menu bar they should be brought to this start-here page.
Linking to pages in your website
Remember the menu bar we made for the template? We added blocks to is with this piece of code: <a href="">***NEW? Start HERE***</a>
We let href=“” empty because we had nothing to link to. But now that we have pages we can link to them there.
One of the things we define in urls.py is the name of a domain. We use this in href to refer to other pages. Because we called our new page ‘start-here’ and our home page ‘home’ we can link to them using that name.
Add that reference to the block in your base template and try clicking on it:
<! — /MySite/templates/base.html —>
<a href="{% url ‘start-here' %}">***NEW? Start HERE***</a>
It should now bring you to this new page in your website. Remember to use the {% url ‘name’ %} command so that django knows to look in its url paths for the right page.
We can do the same for our header image by wrapping it in a link:
<a href="{% url 'home' %}”>
<img src=“link_to_image”>
</a>
Now if we click on the header image it will take us back to the home page.
Finally, to add links to the buttons on our homepage we can use the same “<a href” method (note: these are called anchor tags.
<!— /MySite/templates/home.html —>
…
<button type="button" style="background-color:cyan;"><a href="{% url 'start-here' %}">Learn More</a>
…
Using this we can build out the rest of the website.
Using CSS to style your website
At this point we have our prototype ready. The client is happy, time to move things to the next step. The content and structure is in place, now it’s time to make it look more closely to the designs they sent you. We will do this using CSS or cascading style sheets.
What is CSS? CSS, or Cascading Style Sheets, are used to separate the design from the content. So far we’ve only focussed on making sure the structure and content was in place. Basically CSS lets us define the design of our website. We’ll be going through the basics of CSS so that you understand enough to work with them. But since we won’t become a full-fledged frontend engineer the most efficient way to make your websites look professional is to purchase professional templates and edit them with your content. Later, we will look into linking your Django backend to a React frontend, editing a template to make your website look professional, and other steps for proper frontend developemtn. For now, let’s stick to the basics.
In our project directory add a directory called ‘static’. Here we can add images and CSS files that we want to link to in our frontend. If we link to images in our static directory we can view them the same way we did earlier with images that were hosted on other websites. With the CSS files we can define styling and assign those styles to items in our HTML file.
In order for our static directory to work with our frontend we need to change a few things in our settings:
Add the static directory to our settings.py file:
STATIC_URL = 'static/'
STATICFILES_DIRS = (
    os.path.join(BASE_DIR, 'static'),
)
STATIC_ROOT = os.path.join(BASE_DIR, 'staticfiles')
Then, add the static directory to your url patterns by adding “+ static(settings.STATIC_URL, document_root=settings.STATIC_ROOT)” to the end of your urlpatterns list.
Then in your base.html file add the django command to load static files at the top of the file:
{% load static %}
<html>
<head>
<link rel="stylesheet" type="text/css" href="{% static 'css/header.css' %}"> <meta charset="utf-8">
<title>{% block title %}Website{% endblock %}</title>
</head>
In this case, we have a directory in our static directory named css where we made a css file called ‘header.css’. There, we can define styles to link to items in our html file.
Our folder structure would look something like this:
home dir
app1
app2
static
css
header.css
image1.png
image2.png
If we want to link to images in our static directory we can do so by defining the src property as a link to the file:
<img src="{% static 'yourimage.png' %}" width="10%" height="10%" alt="Static Image">
To decorate items in your html file we can do so with the “class=your_styling” property.
Let’s take a look at how we can style an item with css.
There are two ways of styling items with css. You can style built in properties such as the <a> property we worked with, or we can make our own ones with the .new-property method.
If we add this to our css file it will change the text colour for our links to black and decorate them with an underline:
a {
  color: black;
  text-decoration: underline;
}
Furthermore, if we create a new method we can decorate specific elements:
.Container {
    position: absolute;
    left: 50%;
    top: 50%;
    text-align: center;
    border: 2px solid black;
}
This creates a container which we can add in our html file with:
<div class=”Container”>
…
</div>
Now, everything you add within the <div> element called “Container” will be placed roughly in the middle of the page, wrapped in a black box with all the text centred in the middle.
Using these CSS files it’s much easier to style the elements of your webpage and allows you to separate your content from your styling, keeping your code much simpler. Try playing around with these CSS elements a little to figure out how it works and what’s possible.
Why are we doing this?
At the moment, our website will look very amateuristic and it’s taken us a lot of time just to build something that would take five minutes with wordpress. You may be wondering why we would even bother with this. If your website is a static website such as the website we used as a template then you’re right, it’s a waste of time. You would be better off using WordPress for many reasons. BowTiedOpossum has some great guides for wordpress.
If you go to the bowtiedisland.com website right now you will see that it is wonderfully designed with daily updates about crypto news, something that would be much harder to make in Django with very little upside. However, by building our website in Django we are able to add logic that we cannot do with WordPress.
Effectively, Django lets us build the server that our actual website communicates with. That allows us to build components that far extend the functionality of a simple WordPress website. In other words, if we want to build a blog or basic landing page you would use something like WordPress. However, if your goal is to make something like a Substack clone you would need to get more technical, that’s where Django comes in.