
An Introduction To Containerization
An Introduction To Containerization
What are Docker containers and how do they help us?

In our previous article we built an easy website with AWS Amplify. While we went through all the steps to easily set up a dynamic react website for only pennies per month, we glossed over the deployment side of things. The easiest way to do this is by containerizing your application with Docker. Today we will go through:
The basics of containerization
How to containerize an application with Docker
Kubernetes and Docker Compose for bigger deployments
The basics of containerization
Most people with some experience as developers are already familiar with the concept of virtual machines: a simulated computer running inside your computer. With a virtual machine a computer runs its own operating system within a host OS, a computer inside a computer. A virtual machine shares hardware resources with the host, but runs its own operating system.

A container is very similar to a virtual machine, both are methods of virtualising computers. However, while a virtual machine will virtualise the entire computer and operating system, containers will share their OS with the host. This leads to significantly less overhead and faster production.

Without containers we would have one computer running three applications at the same time. With virtual machines we would be bloating our server with three operating systems. Or even worse, we may have three different computers for each of these applications. But with containers we can easily share resources while still keeping each application in its own virtualised environment.
In our previous article we came across a .yaml file when building and deploying our website. The yaml file is a rather simple file that describes how to build and configure your app. This will include commands (such as the ‘npm start’ used to start your React app) but also configurations and settings for the actual container itself (such as memory allocation or build location).
In our case, the yaml file was describing the setup of our Docker container that hosts our website. When we run our React website on our local computer and debug our website, we run a command in the terminal to build the website and visit the location in our browser. This means our computer is running a few different applications in parallel. This could be our IDE, our web browser, the website, and any other applications that are running at the time. While this is fine for local testing, when we actually deploy our website we want to isolate our application as much as possible. This means we have a small container running only the service it needs to.
For a react website this means our container will:
Download the files for our website
Download and install all dependencies
Build and run our website
After doing this we will have a mini computer running our website which we can visit through our web browser. By sharing its resources and operating system with the host we can keep this container lightweight and flexible while keeping our application isolated.
How to containerize an application with Docker
By far the most common tool for building and running containers is Docker. Even a basic understanding of Docker is essential for anyone looking to work as a developer. Nowadays, there are more tools such as Podman or my favourite: Kubernetes.
For this demo we’ll use a React Portfolio Template which you can download here. Downloading Docker can be done on their official website. You’ll need both to follow along with this tutorial.
On your local machine, running the website is quite simple.
Install dependencies with npm install
Run the website with npm start
In order for our docker container to run this website we will need to do the same. Therefore, our Dockerfile will need to tell the container to:
Copy the required files into the container
Expose the port 3000 that hosts our website.
Run the command ‘npm install’
Run the command ‘npm start’
Why do we need to expose the port?
On our local machine the website is running alongside the web browser on the same machine. This means we don’t need to do anything with permissions or ports. But on a container everything will be running in a separate environment, we will need to explicitly tell our container to allow communication along this port. Otherwise the container won’t allow us to see the website.
FROM node:13.12.0-alpine
EXPOSE 3000
COPY package.json ./
COPY package-lock.json ./
RUN npm install
COPY . ./
CMD ["npm", "start"]
Create a Dockerfile in the root directory and copy this into the file. This instructs the container to:
Download the node image. This lets us run the npm commands without effort.
Expose port 3000. This lets us connect to the container on port 3000 and view the website.
Copy the depencency list into the container and install them.
Copy the source files into the container and run “npm start” to start the website.
Using this Dockerfile we can tell docker how to build an image that installs all our requirements and runs the website. Because this uses Docker, this will also work on any system. Meaning that the container will work whether you work on a Windows computer, a Mac, or Linux.
Now, build the image with the following command (make sure Docker is running first):
docker build -t reactsiteThis builds an image from our source files and gives it the tag ‘reactsite’. If you want to send your website to others, you only need to send them this image and as long as they have docker installed they can run the image and go to the website on their local machine. Now if we run the image and publish port 3000 we can visit the website on localhost:3000 the same way we did before. The easiest way to do this is through the user interface by clicking on run and entering port 3000 under extra options. A better way to get used to doing this is through the CLI with this command:
docker run -it -—publish 3000:3000 reactsite:latestAs you can see, the basics of containerization are very simple. Tell your Dockerfile the commands to run to start your app and everything should work. Just knowing these basics will make it extremely easy to deploy your app. For example, if you rent a server your hosting provider will require you to SSH into your server and get things running from there. With Docker all you’ll need to do is push the image to the server and hit the ‘docker run’ command.
Kubernetes and Docker Compose
Writing a Dockerfile and deploying your image is an essential part of deploying websites and web apps. However, the fun doesn’t stop there. Mastering containerisation opens the door to many more applications of containerization. For example, a very common system for deploying and managing containers is kubernetes. Kubernetes allows you to manage networks of containers across various hardware clusters.

For exmaple, you could use Kubernetes to build a scalable web app following the architecture above. The magic of Kubernetes is that it can scale up or down depending on your users’ demands. Allocating more pods (which are one or more containers) if there are more demands. It also makes it incredibly easy to roll out updates, roll back, or monitor processes.
Another essential tool for containerisation is Docker Compose. Docker Compose sits between Kubernetes and Docker, while you are still making a single deployment like Docker does, you can easily set up several smaller containers alongside each other. This is incredible if you have several different services that need to run alongside each other.
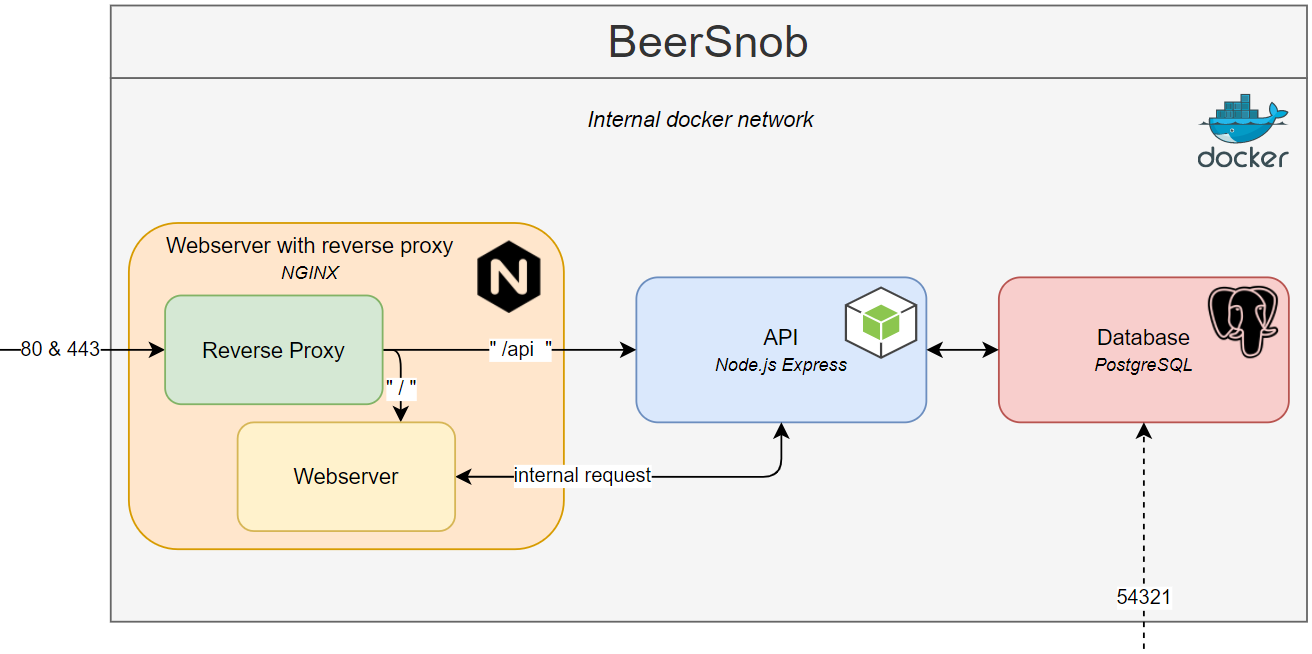
In the above example our app requires three different services: a webserver, an API, and a Database. Instead of putting everything in a single container or managing three separate containers we can use Docker Compose to easily organise all three at once while keeping them in separate containers.
version: '3'

services:

  beersnob_database:
    container_name: beersnob_database
    hostname: beersnob_database
    image: postgres
    volumes:
      - ./volume:/var/lib/postgresql
    environment:
      - POSTGRES_DB=beersnobdb, beersnobdb_dev
      - POSTGRES_USER=mhuls
      - POSTGRES_PASSWORD=aStrongPassword
    ports:
      - 54321:5432
    restart: unless-stopped


  beersnob_api:
    ...


  beersnob_webserver:
      ...
Source: https://towardsdatascience.com/docker-compose-for-absolute-beginners-how-does-it-work-and-how-to-use-it-examples-733ca24c5e6c
In the above example you can see a simplified version of a .yaml file used to set up the aformentioned architecture. In a single file we define the three services and link them together. If you look carfully you can see that this does roughly the same as what we did in our Dockerfile. With “image: postgres” you can set the image for your container the same way we did with “FROM node:13.12.0-alpine”. With “volumes” you load the files and with “ports” you expose the service to a specified port. The formatting is different, but it comes down to the same thing.